Pīkau 22: Incorporating a design process
Why this matters
Following a design process is important when working on solving a problem in your authentic context. It ensures that you are:
- meeting the needs of end-users, stakeholders/whānau/community
- working on something achievable.
The design process is described in the Technological Practice strand supports and guides learners to create a real outcome for a real need - this is what is meant by "Technology is intervention by design" (the opening statement of the Technology learning area ).
You'll need to be familiar with a defined design process so you can help your learners take account of end-users. In later progress outcomes, students begin to develop independence in carrying out learning using a design process.
This pīkau will show you how to incorporate a defined design process into your learning programmes.
You might already know some of this
There are many versions of the design process. You may be using one already, and we'll give some examples later in this pīkau. It is easiest to start with one design process that you can define, and show how students use it when working in the Technology learning area
When solving problems, each learning area of the NZC has its own processes that meet its unique needs. These processes often share a similar sequence of stages but they're called different things.
In the document below we have attempted to show the similarities between common stages of a design process (in the blue banner) and terms you may be familiar with from other learning areas. We have also highlighted how each stage is represented in the Technology learning area.
What are the key features of a design process?
There are many different design processes. However, most design processes share many of the same steps. Knowing what the common steps are, and what's important, can help you adjust a design process to meet the needs of your learners. For example, a design process can be simplified for younger users by changing the language or simplifying some of the steps. Or a design process could made more explicit to support students to use it unassisted. Design processes can also be captured in worksheets or big planning sheets that ask lots of questions and guide students to think through all the stages.


Comparing design processes
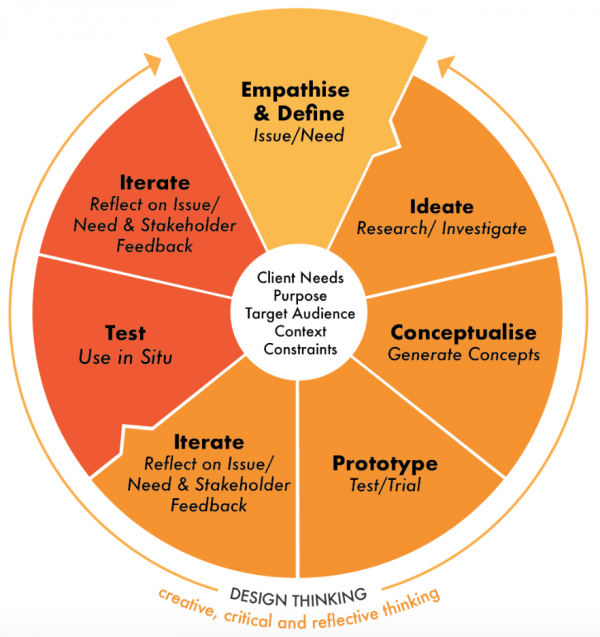
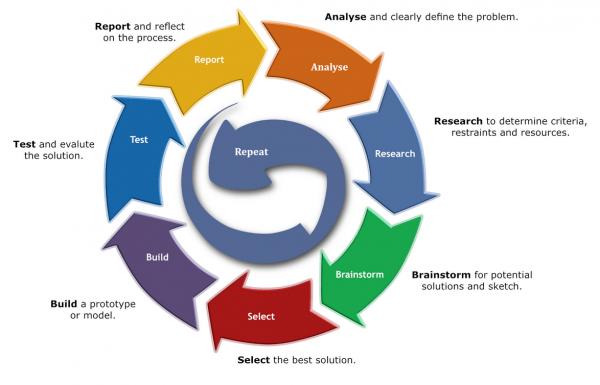
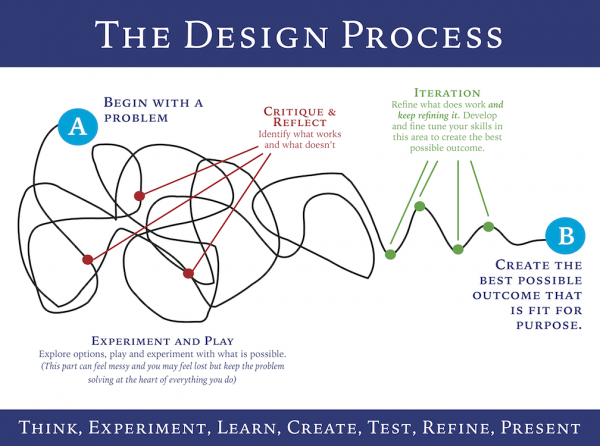
In the gallery below are some diagrams of different design processes. There are many variations as these are used widely in business and industry, but they all have common key features. You may already be using one or more of your own design processes if you are doing Technology in your school.
The purpose of comparing different design processes is to recognise the steps students need to know. Practice in applying these steps will lead to more successful outcomes. For example, when 25 students are designing outcomes, they all design in unique and individual ways, sometimes they approach the process differently. As their teacher, you need be familiar with the key features, and enable the students to design in ways they feel most comfortable (whilst still guiding them through a defined process).
Can you identify the steps that are similar to:
- Empathise
- Define
- Ideate
- Test/model
- Looping back to previous stages in response to new information (Iterate)
- Prototype


Enabling a design process in your learning programme
Encouraging your students to follow a design process can sometimes be an uphill battle. The desire to follow their first idea and get started making something can be very strong.
To make the task of keeping them on track easier, we have created two resources:
- The recording sheet can be printed on A3 and completed by students working in groups. The boxes follow the common stages in a design process and there are key questions and prompts where appropriate.
- The reflection sheet allows students to capture the iteration in their process — the times they went back to revisit previous stages.
Feel free to adapt these resources to fit the needs of your learners, or to use them as they are.
Industry video: How is a digital outcome developed?
In these next clips, Peter from Clever Medkit explains how they developed a digital outcome. See if you can identify some of the stages of the design process in these videos.
This clip describes how a need was identified from an issue in our everyday lives
First aid kits are tricky to keep stocked, and in the workplace, items can often be 'taken' by employees creating an issue when first aid is needed to treat an injury.
Peter explains how his company designed and developed their digital outcome. For more information and to use as a possible industry example of a digital outcome, see Clever First Aid.
The digital first aid kit is the physical outcome (it has a plastic case, shelves, control buttons etc).
The digital outcome is usually the hidden part, that is not usually seen by the end-user. This is called a 'black box' in the Technological Knowledge Strand (Technological systems, NZC Level 3). From approximately end of Year 6, students are expected to understand that a ‘black box’ is a term used to describe a part of a system, like the digital first aid kit, where the inputs and outputs are known but the transformation process is not known. In other words, they know what goes into and out of a system that is doing a job, but not how the input transforms into an output.
The 'black box' part - the electronics and digital systems within the Clever MedKit (computer code to communicate instructions, internet connection to re-order supplies etc) - is explained briefly here:
Teacher practice videos: Using a design process
Teacher practice: Being deliberate about the design process
Watch Steve from Burnside High School share how milestones help the design process.
Using a deliberate structure for projects that includes timetabled milestones as part of a design process will help ensure learners keep on track.
Advice for teaching a design process
Watch Steve from Burnside High School share tips for using a design process.
A complete project that uses the design process takes time, but is very worthwhile - designing, building, testing and improving is much richer than learning discrete skills.
Teaching the design process Y9 & 10
Heidi James from Motueka High School describes how she teaches her Year 9 and Year 10 students about design and using the process to ensure better outcomes.
Teaching the design process
Jo Cault from MoTEC describes her process for engaging students in the design process.
Jo Cault explains how it's important to nudge students to design for someone else, and how important it is to give students time to think and discuss before they come up with their project idea.
How important is it to get stakeholder feedback?
Watch Craig from Mount Aspiring College sharing strategies of how to make the most of stakeholder feedback.
Stakeholder feedback can be very powerful if used effectively. The teacher is the first stakeholder, supplemented by external stakeholders who will likely have very different viewpoints. Bringing experts in earlier may scare the learners!
Once development takes place a cycle of feedback and improvement can start.
Stakeholder feedback from classmates
Watch Steve from Burnside High School share how stakeholder feedback from classmates can improve game outcomes.
Stakeholder feedback is essential for a great outcome. Classmates can be used for stakeholder feedback - especially if they are genuine stakeholders who will test the outcome realistically.
Activity: Incorporating a defined design process into your learning programme
Congratulations! You're almost done! This is the last part of content needed before you can review your digital learning programme.
The student hauora/wellbeing example Designing a mara/garden shows the steps of a defined design process.
Incorporate into your template, the steps you could use to incorporate a defined design process, in the 5th column of your template.
Watch this clip that explains how you might do this.
Wrapping up and where to next?
Well done on adding the digital technology Progress Outcomes and the Strands Achievement Objectives (Pīkau 20), authentic contexts (Pīkau 21) , and a design process (Pīkau 22), to your learning programme!
Ka pai! You're almost there in creating your learning programme! Ka rawe! Awesome!
Complete your journey in Pīkau 23, where you consider how your learning programme could be deliberately delivering some of the principles of the New Zealand Curriculum.
You will then have a final reflect on how it looks, evaluate it, and trial it with your colleagues and students, in your classroom to get their feedback.